푸시 알림은 모바일 앱을 운영할 때, 굉장히 중요한 기능 중 하나입니다.
오늘은 푸시 알림을 구현하는 방법에 대해 기록하고 공유해 보겠습니다.
푸시 알림 관련 설루션으로는 가장 유명한 것은 Firebase를 사용했습니다.
일단 무료인 점이 가장 크고, Firebase를 Flutter에서 잘 사용할 수 있도록 flutterfire라는 플러그인도 운영하고 있어 많은 Flutter 개발자들이 활용하고 있을 것이라고 생각됩니다.
FCM을 이용하여 푸시 알림을 수신할 때에는 크게 3가지 로직이 필요합니다.
- Firebase로부터 메시지를 수신한다.
- 수신한 메시지를 notification으로 보여준다.
- 함께 오는 데이터인 link 정보를 활용해서 적절한 페이지로 이동시킨다.
3번에서 말씀드린 link 정보는 백엔드와 논의를 통해 정한 일종의 스펙입니다.
저희는 Firebase message에서 data 필드에 {”link: ~~”}의 형태를 포함하기로 논의했습니다.
Firebase 연동
다음 문서의 3단계를 진행해서 Flutter 프로젝트와 Firebase 프로젝트를 연결해 주세요.
https://firebase.google.com/docs/flutter/setup?authuser=0&hl=ko&platform=ios
Firebase message 수신 및 Notification 보여주기
Firebase message를 수신하기 위해 기본적인 코드 세팅은 다음과 같습니다.
firebase_messaing의 예제를 참고했습니다. (예제: https://pub.dev/packages/firebase_messaging/example)
import 'package:firebase_core/firebase_core.dart';
import 'package:firebase_messaging/firebase_messaging.dart';
import 'package:flutter_local_notifications/flutter_local_notifications.dart';

bool isFlutterLocalNotificationsInitialized = false;
late FlutterLocalNotificationsPlugin flutterLocalNotificationsPlugin;

late AndroidNotificationChannel channel;

NotificationResponse? notificationResponseFromBackground;

Future<void> setupFlutterNotifications() async {
  if (isFlutterLocalNotificationsInitialized) {
    return;
  }

  channel = const AndroidNotificationChannel(
    'AndroidNotificationChannel ID',
    'AndroidNotificationChannel 이름',
    description: 'AndroidNotificationChannel 설명',
    importance: Importance.high,
  );

  flutterLocalNotificationsPlugin = FlutterLocalNotificationsPlugin();

  await flutterLocalNotificationsPlugin
      .resolvePlatformSpecificImplementation<
          AndroidFlutterLocalNotificationsPlugin>()
      ?.createNotificationChannel(channel);

    // iOS의 foreground 상태에서 Firebase message를 수신하기 위함
  await FirebaseMessaging.instance.setForegroundNotificationPresentationOptions(
    alert: true,
    badge: true,
    sound: true,
  );

  isFlutterLocalNotificationsInitialized = true;
}

void main() async {
  await Firebase.initializeApp(
    options: DefaultFirebaseOptions.currentPlatform,
  );

  await setupFlutterNotifications();

  runApp(MyApp());
}
Firebase message가 앱에 도착했을 때, 앱은 3가지 상태일 수 있습니다.
(Foreground, Background, Terminated)
각자 Firebase message를 수신하는 방식이 다른데요, 하나씩 알아보겠습니다.
Foreground
Foreground는 앱이 실행되고 있는 상태를 의미합니다.
Android
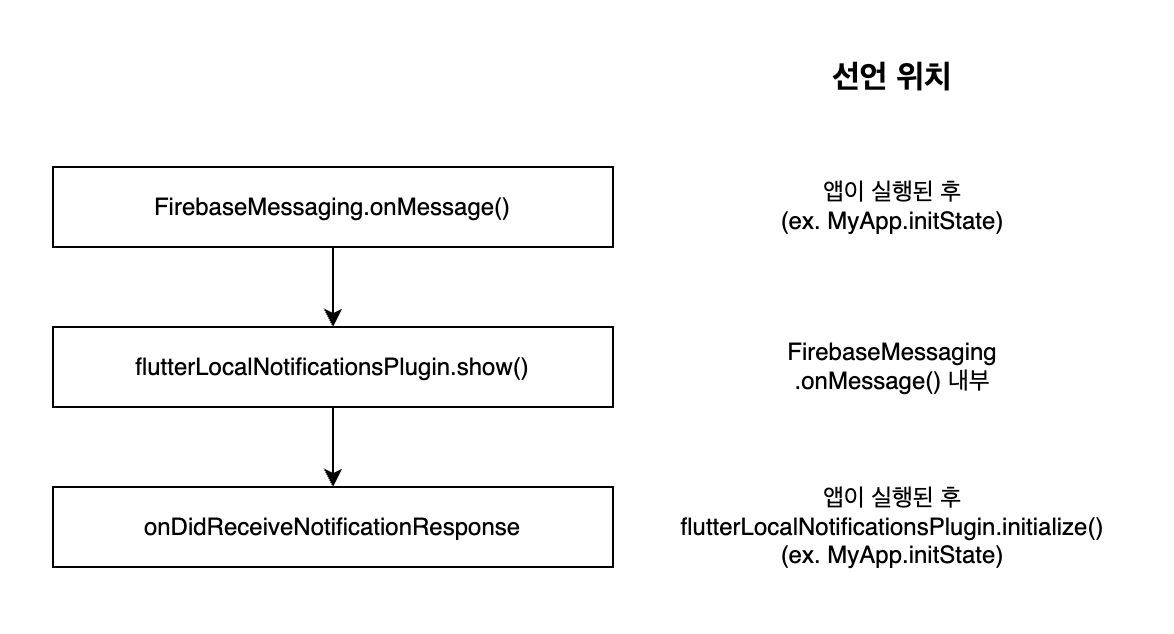
android에서는 FirebaseMessaging.onMessage()를 통해 Firebase message를 수신합니다.
FlutterLocalNotificationsPlugin.show() 에 존재하는 String payload 프로퍼티를 통해 설정한 데이터가 onDidReceiveNotificationResponse의 NotificationResponse.payload로 전달됩니다.
flutterLocalNotificationsPlugin.initialize(
  const InitializationSettings(
    android: AndroidInitializationSettings('앱 아이콘 이름'),
    iOS: DarwinInitializationSettings(),
  ),
  onDidReceiveNotificationResponse: (NotificationResponse details) {
    final String? link = jsonDecode(payload ?? '')['link']
    if (link != null) {
      // 네비게이션 로직
    }
  },
);

FirebaseMessaging.onMessage.listen((RemoteMessage message) {
	flutterLocalNotificationsPlugin.show(
    message.notification.hashCode,
    message.notification?.title,
    message.notification?.body,
    NotificationDetails(
      android: AndroidNotificationDetails(
        channel.id,
        channel.name,
        channelDescription: channel.description,
        icon: '앱 아이콘 이름',
      ),
      iOS: const DarwinNotificationDetails(),
    ),
    // payload를 전달해주어야 onDidReceiveNotificationResponse에서
    // payload를 읽을 수 있습니다.
    payload: jsonEncode(message.data),
  );
});
iOS
iOS의 별다른 설정 없이도 Firebase message를 수신합니다.
추측하기로는 APNs를 설정했기 때문에 알아서 처리해 주는 것 같습니다.
오히려 FirebaseMessaging.onMessage()를 사용하게 되면 push notification이 2번 보이게 되니 유의하면 좋습니다.
iOS에서 Firebase Message가 가지고 있는 데이터를 활용하려면 FirebaseMessaging.onMessageOpenedApp()를 활용하면 됩니다.
FirebaseMessaging.onMessageOpenedApp()는 background 상태일 때 Firebase message의 데이터를 활용하기 위해서도 필요한데 아래에서 다루겠습니다.
따라서 Foreground 상태에서 Firebase message관련 코드는 다음과 같습니다.
class MyApp extends StatefulWidget {
  const MyApp({super.key});

  @override
  State createState() => _MyAppState();
}

class _MyAppState extends State {
  @override
  void initState() {
    super.initState();

    flutterLocalNotificationsPlugin.initialize(
      const InitializationSettings(
        android: AndroidInitializationSettings('앱 아이콘 이름'),
        iOS: DarwinInitializationSettings(),
      ),
      onDidReceiveNotificationResponse: (NotificationResponse details) {
        final String? link = remoteMessage.data['link'];
        if (link != null) {
          // link를 이용한 네비게이션 로직
        }
      },
    );

    if (Platform.isAndroid) {
      FirebaseMessaging.onMessage.listen((RemoteMessage message) {
        flutterLocalNotificationsPlugin.show(
          message.notification.hashCode,
          message.notification?.title,
          message.notification?.body,
          NotificationDetails(
            android: AndroidNotificationDetails(
              channel.id,
              channel.name,
              channelDescription: channel.description,
              icon: '앱 아이콘 이름',
            ),
            iOS: const DarwinNotificationDetails(),
          ),
          payload: jsonEncode(message.data),
        );
      });
    }

    FirebaseMessaging.onMessageOpenedApp.listen((RemoteMessage remoteMessage) {
      final String? link = remoteMessage.data['link'];
      if (link != null) {
        // link를 이용한 네비게이션 로직
      }
    });
  }
}
Background
앱이 백그라운드에서 실행되고 있는 상태입니다.
예시로 홈 버튼을 눌렀을 경우나 다른 앱으로 화면을 변경한 경우가 있습니다.
Android
Android에서 background 상태일 때 Firebase message를 수신하기 위해서는 FirebaseMessaging.onBackgroundMessage를 사용합니다.
  @pragma('vm:entry-point') // 빌드 후 트리 쉐이킹을 통해 제거되지 않도록 합니다.
  Future<void> _firebaseMessagingBackgroundHandler(RemoteMessage message) async {
    await Firebase.initializeApp(options: DefaultFirebaseOptions.currentPlatform);
    await setupFlutterNotifications();
  }

  FirebaseMessaging.onBackgroundMessage(_firebaseMessagingBackgroundHandler);
iOS
별다른 코드가 필요하지 않습니다.
두 OS에서 공통적으로 수신한 Firebase message에 데이터에 접근하기 위해서 FirebaseMessaging.onMessageOpenedApp.listen()을 사용합니다.
FirebaseMessaging.onMessageOpenedApp.listen((RemoteMessage remoteMessage) {
  final String? link = remoteMessage.data['link'];
  if (link != null) {
    // link를 이용한 네비게이션 로직
  }
});
Terminated
앱이 완전히 종료된 상태를 의미합니다.
main 함수 안에서 FirebaseMessaging.onBackgroundMessage 메서드를 통해 Firebase message를 수신했을 때 로직을 선언합니다.
이때 주의할 점은 최상단에 선언되어야 하고, 익명함수이면 안됩니다.
This provided handler must be a top-level function and cannot be anonymous otherwise an [ArgumentError] will be thrown.
알림을 통해 앱이 실행되었다면 FirebaseMessaging.instance.getInitialMessage()를 통해 해당 알림에 대한 정보를 받을 수 있습니다.
제가 필요한 것은 link 정보이므로 위에서 설명한 것처럼 payload에 json으로 인코딩해서 넣어줍니다.
이후에 라우팅을 세팅할 때, 초기 주소를 notificationResponseFromBackground에 저장된 값을 검사하여 사용합니다.
NotificationResponse? notificationResponseFromBackground;

@pragma('vm:entry-point') // 빌드 후 트리 쉐이킹을 통해 제거되지 않도록 합니다.
Future _firebaseMessagingBackgroundHandler(RemoteMessage message) async {
  await Firebase.initializeApp(options: DefaultFirebaseOptions.currentPlatform);
  await setupFlutterNotifications();

  // Android, iOS terminated일 때,
  notificationResponseFromBackground = const NotificationResponse(
      notificationResponseType: NotificationResponseType.selectedNotification);

  showFlutterNotification(message);
}

void main() async {
  await Firebase.initializeApp(
    options: DefaultFirebaseOptions.currentPlatform,
  );

  FirebaseMessaging.onBackgroundMessage(_firebaseMessagingBackgroundHandler);

  runApp(MyApp());
}

class MyApp extends StatefulWidget {
  const MyApp({super.key});

  @override
  State createState() => _MyAppState();
}

class _MyAppState extends State {
  @override
  void initState() {
    super.initState();

    FirebaseMessaging.instance
        .getInitialMessage()
        .then((RemoteMessage? remoteMessage) {
      if (remoteMessage == null) {
        return;
      }

      notificationResponseFromBackground = NotificationResponse(
        notificationResponseType: NotificationResponseType.selectedNotification,
        id: remoteMessage.hashCode,
        payload: jsonEncode(remoteMessage.data),
      );
    });
  }
}
최종 코드
위에 설명 이외에 권한 요청과 같은 코드들을 다 포함한 최종 코드입니다.
late FlutterLocalNotificationsPlugin flutterLocalNotificationsPlugin;

late AndroidNotificationChannel channel;

bool isFlutterLocalNotificationsInitialized = false;

NotificationResponse? notificationResponseFromBackground;

Future<void> setupFlutterNotifications() async {
  if (isFlutterLocalNotificationsInitialized) {
    return;
  }

  channel = const AndroidNotificationChannel(
    'AndroidNotificationChannel ID',
    'AndroidNotificationChannel 이름',
    description: 'AndroidNotificationChannel 설명',
    importance: Importance.high,
  );

  flutterLocalNotificationsPlugin = FlutterLocalNotificationsPlugin();

  await flutterLocalNotificationsPlugin
      .resolvePlatformSpecificImplementation<
          AndroidFlutterLocalNotificationsPlugin>()
      ?.createNotificationChannel(channel);

    // iOS의 foreground 상태에서 Firebase message를 수신하기 위함
  await FirebaseMessaging.instance.setForegroundNotificationPresentationOptions(
    alert: true,
    badge: true,
    sound: true,
  );

  isFlutterLocalNotificationsInitialized = true;
}

void main() async {
  await Firebase.initializeApp(
    options: DefaultFirebaseOptions.currentPlatform,
  );

  await setupFlutterNotifications();

  FirebaseMessaging.onBackgroundMessage(_firebaseMessagingBackgroundHandler);

  runApp(const ProviderScope(child: MyApp()));
}

class MyApp extends ConsumerStatefulWidget {
  const MyApp({super.key});

  @override
  ConsumerState<MyApp> createState() => _MyAppState();
}

class _MyAppState extends ConsumerState<MyApp> {
  @override
  void initState() {
    super.initState();

        // OS에 따른 권한 요청 로직
    if (Platform.isAndroid) {
      flutterLocalNotificationsPlugin
          .resolvePlatformSpecificImplementation<
              AndroidFlutterLocalNotificationsPlugin>()
          ?.requestPermission();
    } else {
      flutterLocalNotificationsPlugin
          .resolvePlatformSpecificImplementation<
              IOSFlutterLocalNotificationsPlugin>()
          ?.requestPermissions();
    }

    flutterLocalNotificationsPlugin.initialize(
      const InitializationSettings(
        android: AndroidInitializationSettings('앱 아이콘 이름'),
        iOS: DarwinInitializationSettings(),
      ),
      // Android - foreground에서 notification을 눌렀을 때 작동합니다.
      // foreground에서는 context가 살아있기 때문에 직접 stateNotifier를 업데이트합니다.
      onDidReceiveNotificationResponse: (NotificationResponse details) {
        final String? link = remoteMessage.data['link'];
          if (link != null) {
             // link를 이용한 네비게이션 로직
          }
      },
    );

    if (Platform.isAndroid) {
      FirebaseMessaging.onMessage.listen((RemoteMessage message) {
        flutterLocalNotificationsPlugin.show(
          message.notification.hashCode,
          message.notification?.title,
          message.notification?.body,
          NotificationDetails(
            android: AndroidNotificationDetails(
              channel.id,
              channel.name,
              channelDescription: channel.description,
              icon: '앱 아이콘 이름',
            ),
            iOS: const DarwinNotificationDetails(),
          ),
          payload: jsonEncode(message.data),
        );
      });
    }

    FirebaseMessaging.instance
        .getInitialMessage()
        .then((RemoteMessage? remoteMessage) {
      if (remoteMessage == null) {
        return;
      }

      notificationResponseFromBackground = NotificationResponse(
        notificationResponseType: NotificationResponseType.selectedNotification,
        id: remoteMessage.hashCode,
        payload: jsonEncode(remoteMessage.data),
      );
    });

    FirebaseMessaging.onMessageOpenedApp.listen((RemoteMessage remoteMessage) {
      final String? link = remoteMessage.data['link'];
      if (link != null) {
         // link를 이용한 네비게이션 로직
      }
    });
  }

    @override
  Widget build(
    BuildContext context,
  ) {
        //
        return Container();
    }
}
후기
알림 수신 기능을 구현하면서 Flutter 개발자로서의 한계를 많이 느낀 것 같습니다.
알림 기능의 대부분은 네이티브(Platform Side)에서 이뤄져 있어서, 내부적으로 어떻게 알림을 수신할 수 있는지 이해하지 못하고 넘어간 부분이 많았습니다.
시간적 여유가 된다면 어디서 Firebase message를 기다리고 있는지 알아내고 싶은 마음이 있습니다.
다만, 작업의 시간이 너무 많이 소요되어서 잠시 미뤄두어야 할 것 같습니다.
오래 걸린 이유는 firebase_messaging, flutter_local_notificaitons과 같은 패키지에서 제공해 주는 예제가 제대로 작동하지 않는 코드가 많아서 수십 번의 테스트를 통해 불필요한 코드를 걷어내는 작업을 진행했습니다.
알림의 경우 Android, iOS의 Foreground, Background, Terminated 상태를 각각 테스트해야 하기 때문에 검증하는 물리적이 시간이 많이 들었습니다.
제가 걷어내고 남은 코드들이 어떠한 역할을 하는지에 대한 기록이 필요하다고 느끼게 되어서 이 글을 작성하게 되었습니다.
'개발 노트 > Flutter' 카테고리의 다른 글
| late 변수의 할당 여부 검사 (0) | 2022.06.18 |
|---|